
loading slides ...

Introducing
html5tag; PASSWORD: berlin will work.
Learn about HTML5
HTML 4.0 is not XML
text/html should be parsed as HTML, documents served as application/xhtml+xml should be parsed as XHTML (no matter what the doctype says)..html or .htm as text/html.text/html).The W3C technology stack:

 Unfortunately the discussion did not run well

2 grasroot-level geek's opinions (from http://programmers.stackexchange.com/questions/86510/why-not-xhtml5):
So, HTML5 is the Big Step Forward, I'm told. The last step forward we took that I'm aware of was the introduction of XHTML. The advantages were obvious: simplicity, strictness, the ability to use standard XML parsers and generators to work with web pages, and so on.
How strange and frustrating, then, that HTML5 rolls all that back: once again we're working with a non-standard syntax; once again, we have to deal with historical baggage and parsing complexity; once again we can't use our standard XML libraries, parsers, generators, or transformers; and all the advantages introduced by XML (extensibility, namespaces, standardization, and so on), that the W3C spent a decade pushing for good reasons, are lost.
Fine, we have XHTML5, but it seems like it has not gained popularity like the HTML5 encoding has. See this SO question, for example. Even the HTML5 specification says that HTML5, not XHTML5, "is the format suggested for most authors."
Do I have my facts wrong? Otherwise, why am I the only one that feels this way? Why are people choosing HTML5 over XHTML5?
I hope I'm not the only one who's glad with the loss of all XML's disadvantages in HTML5. For example, let's compare valid HTML5 to valid XHTML.
HTML5: <!DOCTYPE html>Hello World
XHTML: <?xml version="1.0" encoding="iso-8859-1"?><!DOCTYPE html PUBLIC "-//W3C//DTD XHTML 1.0 Transitional//EN" "DTD/xhtml1-transitional.dtd"><html xml:lang="en" lang="en" xmlns="http://www.w3.org/1999/xhtml"><head><title></title></head><body>Hello World</body></html>
?
Learn about HTML5
HTML5 is a break-up
from http://dev.w3.org/html5/html-design-principles/:
<b>this is<i>really bad</b>HTML</i>but we can easily agree that it is meant to be rendered as
<canvas> fallback </canvas>will deliver
contenteditable attributetext/html) parser puts elements in the http://www.w3.org/1999/xhtml namespace in the DOM for compatibility with the XML syntax of HTML 5 socket, IE6 and older HTML versions as part of heritage, WHATWG sticker on the on the drive axle, and W3C tires on the rim. Web workers are represented by a bike on the backseat.")
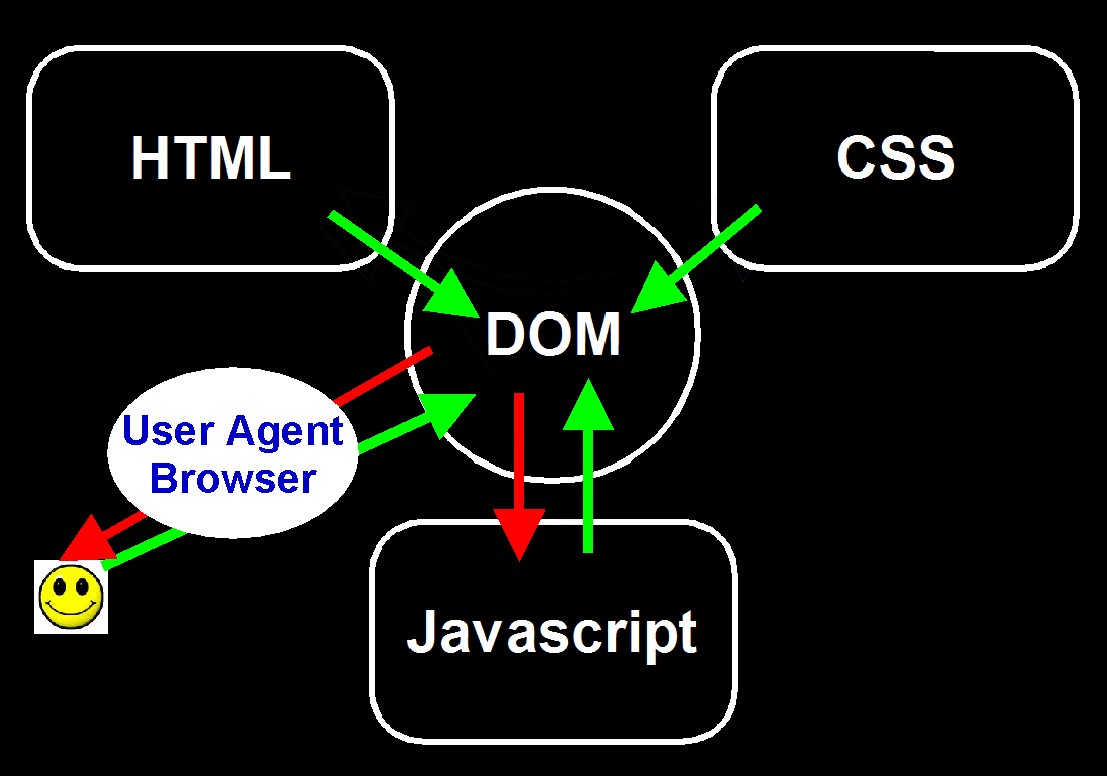 Browser builds an initial DOM from the (declarative) HTML
Introducing the DOM:
Javascript:
Browser builds an initial DOM from the (declarative) HTML
Introducing the DOM:
Javascript:
One year ago:
Today:
A curio:
Wolf in a sheep's clothing: Google Chrome Frame plug-in for MS Internet Explorer (6 to 9)
A foreign HTML engine as browser plugin

?
Learn about new HTML5 mark-up
Achievements of new Mark-up
<div class=xxx> constructs)<canvas> element provides an interface to low level graphics APIsAchievements of new Mark-up
document – many are inherited by elements)<!DOCTYPE html> instead of e.g. <!DOCTYPE html PUBLIC "-//W3C//DTD XHTML 1.0 Transitional//EN" "http://www.w3.org/TR/xhtml1/DTD/xhtml1-transitional.dtd">data-*)<template> and <element> for custom elements.Learn how to structure documents with HTML5
<section> <nav> <article> <aside> <hgroup> <header> <footer> and recently <main> <hgroup> has been deprecated by W3C.
<article> <aside> <nav> <section> sectioning elementsThe document outline
The document outline
<article>, <section>, <nav>, and <aside><body>, <blockquote>, <details>, <fieldset>, <figure> and <td><h1> – <h6> <hgroup><hgroup> only can contain <h1> – <h6> grouping them to form a single section header<h*> <hgroup>A few good practices:
<article> parts of the document that could be syndicated on their own<section> other parts of a document (e.g. chapters)<nav> list of links related to the document<aside> content that is related part not part of the document flowAn example:
    <article lang=zh>
      <h1>他会说汉语吗?</h1>
      <p>这是我的朋友。他是德国人。</p>
      <p>他不会受汉语,他会说一点英语。</p>
      <section lang=de>
        <h1>HTML5 auf chinesisch?</h1>
        <p>Leider kann ich überhaupt nicht Chinesisch sprechen.</p>
      </section>
      <section lang=en>
        <h1>Would English be an option?</h1>
        <p>Maybe it works to give the presentation in English.</p>
        <p>I bet many in the audience can follow an English presentation</p>
      </section>
      <p>对不起。</p>
    </article>
Lets render it:
With a little CSS we can indent according to structure:
      article, section {
          padding-left: 3em;
      }
Lets render it:
A flexible and easily maintainable structure for e.g. technical documents:

An example:
  <article>
    <h1>Main Header</h1>
    <p>Text body in the main section.</p>
    <p>another main paragraph</p>
    <section>
      <p>a paragraph on level 2 before
        the header.</p>
      <h1>Header on level 2</h1>
      <p>Paragraph on level 2</p>

      <section>
        <h1>Header on level 3</h1>
        <p>Paragraph on level 3</p>
      </section>
        <!-- simply moving the following section to here -->
        <!-- makes it a level 3 section -->
</section>
    <section>
      <h1>Another Header on level 2</h1>
      <p>Level 2 paragraph.</p>
    </section>
    <p>Level 1 paragraph</p>
  </article>
Yes there is some CSS 2.1 that does the numbering magic and indentation:
      section {
        margin-left: 2em;
      }

      h1:before {
        counter-increment: headings;
        content: counters(headings, ".") " ";
      }

      article, article section:first-of-type {
        counter-reset: headings;
      }
That's all!
CSS explained:
:first-of-type pseudoelement selects the first sibling of its type in the list of children of its parent element.counter-increment and counter-reset properties content:counter(n) selects the current counter of name ncounters(n,s) joins all counters of name n using the string sSummary on structural elements
<body> main content of a document<nav> a section that mainly links to other pages<aside> content that is tangentially related to the content around it<header> header (or intro) of a section<footer> footer of a section<main> main part of an element<address> contact information for <body> or <article><article>, <aside>, <nav>, <section> starts a new section<blockquote>, <body>, <details>, <dialog>, <fieldset>, <figure>, <td>
are sectioning root elements that start new outlines<hx> implicitly starts a new section if not first hx within a section (avoid!)?
<input> is enhanced by new types like number range date color search tel email url<input> has an attributes placeholder for hints, autofocus min max step<output>, a <progress> and a <meter> elementrequired and especially pattern attributes for even more checking. pattern accepts regular expressions to test for complex patterns.<datalist> element for input suggestionsCSS3 :valid and :invalid pseudo attributes allow feedback while typing.
Our example is using:
    input:valid {background-color:green;}
    input:invalid {background-color:red;}
<output> <progress> <meter><form oninput="comp();"> <label>factor 1: <input id=a type=range min=1 max=10 step=1 value=1 /> <output id=a1 value=1>1</output> </label> <label>factor 2: <input id=b type=range min=1 max=10 step=1 value=1 /> <output id=b1 value=1>1</output> </label> <label>Progressbar sum:<br/> <progress id=s1 max=20 value=2>No progressbar available</progress> <output id=s value=1>1</output> </label> <label>Meter product:<br/> <meter id=p1 min=0 low=20 high=80 value=1 optimum=60 max=100>No meter available</meter> <output id=p value=1>1</output> </label> </form>
  <script type="text/javascript">
      function $(id){return document.getElementById(id)};
      function comp(){
        var x = a1.value = Number(a.value);
        var y = b1.value = Number(b.value);
        $('p1').value=$('p').value=x*y;;
        $('s1').value=$('s').value=x+y;
      }
  </script>
Interlude:
document property designMode which is to specify if documents are editablecontenteditable which is to specify if elements are editablecontenteditable attribute is reflected in the element interface by the contenteditable property.isContentEditable is a property that can be used to check if an element can be edited. isContentEditable returns the boolean values true and false as you would expect. It does not tell you if the property was inherited from ancestor elements or if it was set by the contentEditable property.contenteditable property can have the values "true", "false", "inherited" (case insensitive)Now lets do a bit brainteasing!
Question: if p is an p element object, what is the effect of the following Javascript constructs according to the HTML5 spec?
Solution
p.contentEditable = false;
Sets p.contentEditable to false? Nope it sets it to "false".
The only values allowed for
contentEditable are ASCII case-insensitive matches of "true", "false" or "inherit".
So you better never use in this way: if(contentEditable). Why?
p.isContentEditable will be set to false by this assignment as a side effect. So you better use this for tests.
Solution
document.designMode = true;
Switching design mode on? No! It will simply be ignored.
Solution
p.contentEditable = !p.ContentEditable;
Toggles p.contentEditable? Nope! Sets p.contentEditable to
"false". Always!!! Why???
To toggle use p.contentEditable = !p.isContentEditable;
Solution
document.designMode = "true";
Switching design mode on? (You think you are smart now?)
It will simply be ignored. To switch design mode on you may use
ASCII case-insensitive matches of the string "on". To switch
design mode off … guess what?
Solution
document.designMode = "oFF";
YEP!
Solution
p.contentEditable = "FaLsE";
Sets p.isContentEditable to false and p.contentEditable to "FaLsE"
Confused?
Example document
  <article>
    <h1> Editing</h1>
    <div>
      <p contenteditable="true" id=edit>
        Please feel free to edit this paragraph.
        <span contenteditable="false"
          >but dont touch this section
        </span>
        OK?
      </p>
    </div>
    <button type=button onclick="saveEdits()">Save</button>
    <button type=button onclick="restoreEdits()">Restore</button>
    <button type=button onclick="clear()">Clear</button>
    <button type=button onclick="reset()">Reset</button>
  </article>
A bit CSS to make things more readable
    body  { background-color:#000000; color:#ff8000; }
    [contenteditable="true"]  { color:#ffffff; }
    [contenteditable="false"] { color:#ff8000; }
Example document
The purpose of contentEditable/designMode is to provide a Richt Text Editing capability within HTML5
How to save changes?
localStoragesetItem(key,value) stores value under key in local storagegetItem(key) returns the value stored under keyremoveItem(key)removes key and associated value from local storageclear() clears local storage (for this domain) function saveEdits(){ window.localStorage.setItem ("edits",document.getElementById("edit").innerHTML); } function restoreEdits(){ var e = window.localStorage.getItem("edits"); if (e) document.getElementById("edit").innerHTML = e; } function clearStorage(){ window.localStorage.clear(); } function reset(){ location = location; }
Media elements provide a lot of events, attributes/properties and methods
onloadedmetadata; onloadeddata; oncanplay; oncanplaythrough; onplaying; onended; onwaiting; ondurationchange; ontimeupdate; onplay; onpause; onratechange; onvolumechangedefaultPlaybackRate; playbackRate; volume; muted; currentTime; mediaGroup; ...play(); pause(); canPlayType(DOMString type);buffered; seekable; duration; paused; played; readyState; …TimeRanges: buffered; seekable; played;A simple example
  <!DOCTYPE html>
  <html>
    <head>
      <title>... — ict-Media GmbH</title>
    </head>
    <body>
      <h1>A simple video player</h1>
      <video src="video-s.ogv" controls muted>
        Your browser does not support this video format
      </video>
    </body>
  </html>
video and audio have a “parent Object” media in common that provides many properties, methods and events to control playingLets control our video from the DOM, HTML mark-up
  <body>
    <video id=video src="video-s.ogv"></video><br/>
    <p>
      <progress id=progressBar value=0></progress><br/>
      Position <span id=currentTime> </span>/
               <span id=videoDuration> </span>.
      Playback rate: <span id=speed> </span>
    </p>
    <p>
      <button onclick="setPlayStop()" id=playStop disabled>play</button>
    </p>
    <p id=speedButtons>
      <button onclick="setspeedButtons(0.25)" disabled>slow</button>
      <button onclick="setspeedButtons(1)" disabled>normal</button>
      <button onclick="setspeedButtons(4)" disabled>fast</button>
    </p>
  </body>
  </html>
To do:
document.readyState == 'interactive' (mark-up is parsed) to initialize events, variables for elements
document.load could be too late since by then some video events may already have happened (esp. Firefox)loadedmetadata event initializes and activates video controlsInit our video player
  // Variables to hold elements

  var video, playStop, speedButtons, videoDuration,
      currentTime, progressBar, speed;

  // When document is "interactive" ("complete" might be
  // too late for some video events)

  document.addEventListener('readystatechange',
    function(){
      if (document.readyState == 'interactive') init();
    },
    false);
Initialize our video player
  function init(){
      // Helper functions
      function select(s){ // elements
        var a = document.querySelectorAll(s);
        return a.length == 1 ? a[0] : a;
      }
      function addVEvts(){ //Video events
        for (var i=0;i<arguments.length;i++)
          video.addEventListener(arguments[i],
            function(e){vEvt(e.type)},
            false);
      }
      // Retrieve elements
      video = select("#video"), playStop = select("#playStop"),
        currentTime = select("#currentTime"), speed = select("#speed"),
        progressBar = select("#progressBar"), videoDuration =
        select("#videoDuration"), speedButtons = select('#speedButtons *');
      // Set Video events
      addVEvts('canplay','loadedmetadata','loadeddata','canplaythrough',
        'playing','ended','waiting','timeupdate','play','pause',
        'ratechange');
  }
Video event processing for our video player
  function vEvt(which){

      function timeupdate(){progressBar.value=video.currentTime;
                  currentTime.textContent = tm(video.currentTime);}

      function play(){playStop.textContent = "pause";}

      function pause(){playStop.textContent = "play";}

      function ratechange() {speed.textContent = String(video.playbackRate);}

      function loadedmetadata() {  // initialize and activate controls () see next slide}

      switch(which){
        case 'timeupdate': timeupdate(); break;
        case 'loadedmetadata': loadedmetadata(); break;
        case 'ratechange': ratechange(); break;
        case 'play': play(); break;
        case 'pause': pause(); break;
      }
  }
loadedmetadata event: initialize and activate controls
        function loadedmetadata() { // initialize

          video.muted=true;

          playStop.disabled = false;
                for (var i=0;i<speedButtons.length;i++)
            speedButtons[i].disabled = false;

          progressBar.style.width = (video.videoWidth)+"px";
          progressBar.max = video.duration;

          videoDuration.textContent = tm(video.duration);
          currentTime.textContent = tm(video.currentTime);
          speed.textContent = video.playbackRate;
                }
Here the controls for our video player
  function setPlayStop() {
      if (video.paused) {
          if (video.ended) video.currentTime = 0; // rewind
          video.play();
      } else {video.pause();}
  }

  function setspeedButtons(i){video.playbackRate = i;}

  function tm(t){
      return ("0"+Math.floor(t/3600)).substr(-2)+":"+
             ("0"+Math.floor(t % 3600) / 60).substr(-2)+":"+
             ("0"+Math.round(t % 60)).substr(-2);
  }
a surprising example
<input ... type=range element rendered as a sliderdivs, CSS and JavascriptGoogle Chrome: inspection of a <input ... type=range element

Some rules
content property, which accesses its content
    <head>
      <meta charset="UTF-8">
      <title>templates — ict-Media GmbH</title>
      <template class=record>
        <div>
            <strong class=name>Name</strong> worked as
            <span class=func>function</span>
        </div>
      </template>
      <script>
        function addrecord(l, n, f) {
          var t = document.querySelector(".record");
          var m = t.content.cloneNode(true);
          // Populate content.
          m.querySelector('.name').textContent = n;
          m.querySelector('.func').textContent = f;
          document.querySelector(l).appendChild(m);
        }
      </script>
    </head>
    <body>
      <h1>Templates</h1>
        <div id=list1>
          <script>
            addrecord("#list1","Karl","emperor");
            addrecord("#list1","Hubert","hunter");
            addrecord("#list1","Martin","coat cutter");
          </script>
        </div>
    </body>
Custom Elements
-" Custom Elements with shadow Dom example:
<body> <h1>Ohmsches Gesetz</h1> <p>Wir benutzen <code><x-slider></code> — den logarithmischen Slider von <code>html5-tag.de</code>.</p> <x-slider min=0.0001 max=10000000 id=U value=1>V Spannung</x-slider><br /> <x-slider min=0.000001 max=1000000 id=I value=1>A Strom</x-slider><br /> <x-slider min=0.1 max=100000000 id=R value=1>Ω Widerstand</x-slider> </body>
x-Slider has the following properties:
textContent will be attached.This is all a developer needs to know about it
The computations of Custom Elements example:
function init(){

    // adjust other sliders to confom to Ohm's law
    function sliderAdjust(e){
        if (e.target == U) I.setAttribute("value",U.value/R.value);
        if (e.target == I) R.setAttribute("value",U.value/I.value);
        if (e.target == R) I.setAttribute("value",U.value/R.value);
    };

    // assign vars to elements
    var U = document.getElementById("U");
    var I = document.getElementById("I");
    var R = document.getElementById("R");

    // listen to slider changes
    U.addEventListener("x-slider-changed",sliderAdjust);
    I.addEventListener("x-slider-changed",sliderAdjust);
    R.addEventListener("x-slider-changed",sliderAdjust);
}
3 ways to define the x-slider element used in our Custom Elements example:
1. straight forward copying the code:
(function() {

    function formatEng(n){
        var mod = ["p","n","µ","m"," ","K","M","G","T"];
        var exp=4;
        var m = n;
        for (; m>=1000; m/=1000) exp +=1;
        for (; m<1; m*=1000) exp -=1;
        m = String(m);
        if (m.indexOf(".") === -1) m += ".";
        return (m + "0000").substr(0,5) + " " + mod[exp];
    }

    // first we inherit from <span>
    var XSliderProto = Object.create(HTMLSpanElement.prototype);
    var l10 = Math.log10 || function(x){return Math.log(x) / Math.LN10};
    var e10 = function(x){return Math.pow(10,x)};

    //we do more when the element is created
    XSliderProto.createdCallback = function() {

        // add some properties to our custom element
        this.value = this.getAttribute("value");
        this.name = this.getAttribute("name");
        this.min = this.getAttribute("min");
        this.max = this.getAttribute("max");

        // populate custom element
        this.innerHTML =
            "<style scoped>span {font-size: 200%;}</style>" + // note the use of scoped CSS here
            "<input type=range class=slider min=" + l10(this.min) + " max=" + l10(this.max) + " step=" + 0.001 + " value=" + l10(this.value) +" />" +
            "<span class=value>" + formatEng(this.value) +"</span>" +
            "<span class=descr>" + this.textContent + "</span>";

        var slider = this.querySelector("input.slider");
        var numeric = this.querySelector("span.value");

        // slider change event
        var that = this;
        slider.addEventListener("change",function(e){
            var v = e10(slider.value)
            numeric.textContent = formatEng(v);
            if (that.value != v){
                that.value = v;
                if (that.getAttribute("value") != v)
                    that.setAttribute("value",v);
            }
        });
    }

    // we define a callback in case of user interaction
    XSliderProto.attributeChangedCallback = function(attrName, oldVal, newVal){
        if (attrName == "value") {
            if (oldVal != newVal){
                var slider = this.querySelector("input.slider");
                var numeric = this.querySelector("span.value");

                if (this.value != this.getAttribute("value")){ // call after computed change?
                    this.value = newVal;
                    slider.value = l10(newVal);
                    numeric.textContent = formatEng(newVal);
                }

                else { // call after manual change ... do computations
                    var event = new CustomEvent("x-slider-changed");
                    this.dispatchEvent(event);
                }
            }
        }
    }

    // finally register new element
    var XSlider = document.registerElement('x-slider', {prototype: XSliderProto});

})();
2. element guts in a shadow dom:
(function() {

    function formatEng(n){
        var mod = ["p","n","µ","m"," ","K","M","G","T"];
        var exp=4;
        var m = n;
        for (; m>=1000; m/=1000) exp +=1;
        for (; m<1; m*=1000) exp -=1;
        m = String(m);
        if (m.indexOf(".") === -1) m += ".";
        return (m + "0000").substr(0,5) + " " + mod[exp];
    }

    // first we inherit from <span>
    var XSliderProto = Object.create(HTMLSpanElement.prototype);
    var l10 = Math.log10 || function(x){return Math.log(x) / Math.LN10};
    var e10 = function(x){return Math.pow(10,x)};

    //we do more when the element is created
    XSliderProto.createdCallback = function() {

        // create shadow root
        shadow = this._shadow = this.createShadowRoot();

        // add some properties to our custom element
        this.value = this.getAttribute("value");
        this.name = this.getAttribute("name");
        this.min = this.getAttribute("min");
        this.max = this.getAttribute("max");

        // populate shadow DOM
        shadow.innerHTML =
            "<style>span {font-size: 200%;}</style>" +
            "<input type=range class=slider min=" + l10(this.min) + " max=" + l10(this.max) + " step=" + 0.001 + " value=" + l10(this.value) +" />" +
            "<span class=value>" + formatEng(this.value) +"</span>" +
            "<span class=desr><content></content></span>"; // shadow host innerHTML goes to <content>

        var slider = shadow.querySelector("input.slider");
        var numeric = shadow.querySelector("span.value");

        // slider change event
        var that = this;
        slider.addEventListener("change",function(e){
            var v = e10(slider.value)
            numeric.textContent = formatEng(v);
            if (that.value != v){
                that.value = v;
                if (that.getAttribute("value") != v)
                    that.setAttribute("value",v);
            }
        });
    }

    // we define a callback in case of user interaction
    XSliderProto.attributeChangedCallback = function(attrName, oldVal, newVal){
        if (attrName == "value") {
            if (oldVal != newVal){
                var slider = this._shadow.querySelector("input.slider");
                var numeric = this._shadow.querySelector("span.value");

                if (this.value != this.getAttribute("value")){ // call after computed change?
                    this.value = newVal;
                    slider.value = l10(newVal);
                    numeric.textContent = formatEng(newVal);
                }

                else { // call after manual change ... do computations
                    var event = new CustomEvent("x-slider-changed");
                    this.dispatchEvent(event);
                }
            }
        }
    }

    // finally register new element
    var XSlider = document.registerElement('x-slider', {prototype: XSliderProto});

})();
3. HTML import using template and shadow dom:
<template class="xslider">
    <style>span {font-size: 200%;} </style>
    <input type=range class=slider step="0.02"/>
    <span class=value></span><span class=descr><content>
      <!-- shadow host innerHTML goes here --></content>
      </span>
</template>

<script type="text/javascript">
(function() {

    function formatEng(n){
        var mod = ["p","n","µ","m"," ","K","M","G","T"];
        var exp=4;
        var m = n;
        for (; m>=1000; m/=1000) exp +=1;
        for (; m<1; m*=1000) exp -=1;
        m = String(m);
        if (m.indexOf(".") === -1) m += ".";
        return (m + "0000").substr(0,5) + " " + mod[exp];
    }

    // first we inherit from <span>
    var XSliderProto = Object.create(HTMLSpanElement.prototype);
    var l10 = Math.log10 || function(x){return Math.log(x) / Math.LN10};
    var e10 = function(x){return Math.pow(10,x)};

    //we do more when the element is created
    XSliderProto.createdCallback = function() {

        // add some properties to our custom element
        this.value = this.getAttribute("value");
        this.name = this.getAttribute("name");
        this.min = this.getAttribute("min");
        this.max = this.getAttribute("max");

        // dig template fragment (traverse imp boundary via 'imp' property)
        var imp = document.querySelector("link[href$=\"x-slider.html\"]").import;
        /* (traverse template boundary via 'content' here -
           why the hell do we use a template here) */
        var template = imp.querySelector("template").content.cloneNode(true);

        // adjust Shadow dom elements
        var slider = template.querySelector("input.slider");
        var numeric = template.querySelector("span.value");
        slider.setAttribute("min",l10(this.min));
        slider.setAttribute("max",l10(this.max));
        slider.setAttribute("value",l10(this.value));
        slider.setAttribute("step",0.001);

        numeric.textContent = formatEng(parseInt(this.value));

        // create shadow root
        shadow = this._shadow = this.createShadowRoot();
        // attach fragment to the shadow root
        shadow.appendChild(template);

        // slider change event
        var that = this;
        slider.addEventListener("change",function(e){
            var v = e10(slider.value)
            numeric.textContent = formatEng(v);
            if (that.value != v){
                that.value = v;
                if (that.getAttribute("value") != v)
                    that.setAttribute("value",v);
            }
        });
    }

    // we define a callback in case of user interaction
    XSliderProto.attributeChangedCallback = function(attrName, oldVal, newVal){
        if (attrName == "value") {
            if (oldVal != newVal){
                var slider = this._shadow.querySelector("input.slider");
                var numeric = this._shadow.querySelector("span.value");

                if (this.value != this.getAttribute("value")){ // call after computed change?
                    this.value = newVal;
                    slider.value = l10(newVal);
                    numeric.textContent = formatEng(newVal);
                }

                else { // call after manual change ... do computations
                    var event = new CustomEvent("x-slider-changed");
                    this.dispatchEvent(event);
                }
            }
        }
    }

    // finally register new element
    var XSlider = document.registerElement('x-slider', {prototype: XSliderProto});

})();

</script>
We cannot cover it all — here a summary and some links
A word on Polymer (graphic from Eric Bidelman):

ondragstart, ondragenter, ondragover, ondrop, ondragenddataTransfer object (at least I tried)A disc looks like this (red parts vary from disc to disc):
<div class=disk id=s#>=</div>
Towers are the container of disks (where you drop the disks) and look like this:
<div class=tower id=t#>


<!-- disks follow -->


                </div>
Following is the HTML mark-up:
  <div class=game>
    <div class=tower id=t1>
      <div class=disk id=s1>=</div>
      <div class=disk id=s2>==</div>
      <div class=disk id=s3>===</div>
      <div class=disk id=s4>====</div>
      <div class=bottom id=z1>/\/\/\/\/\/\/\/\/\</div>
    </div>
    <div class=tower id=t2>
      <div class=bottom id=z2>/\/\/\/\/\/\/\/\/\</div>
    </div>
    <div class=tower id=t3>
      <div class=bottom id=z3>/\/\/\/\/\/\/\/\/\</div>
    </div>
  </div>
A little bit of CSS ...
  div.game {
    width: 350px;
    height: 140px;
    margin: 10px;
    position: relative;
    background-color:
      #000080;
    }

  div.tower {
    width: 100px;
    position: absolute;
    bottom: 10px;
    background-color:
      #0000f0;
    }
  #t1 {left:10px}
  #t2 {left:120px}
  #t3 {left:230px}

  div.disk, div.bottom{
    text-align: center;
    }
First we have to initialize the drag'n drop events:
var disks, towers, draggedone;

function init(){
    disks = document.getElementsByClassName("disk");
    towers = document.getElementsByClassName("tower");

    for (var i = 0;i<disks.length;i++){
      disks[i].draggable = i==0;
      disks[i].addEventListener("dragstart",dragstart);
    }

    for (var i = 0;i<towers.length;i++){
      towers[i].addEventListener("dragover", dragover);
      towers[i].addEventListener("drop", drop);
      towers[i].addEventListener("dragenter", dragenter);
    }
}
The first event (when we drag a draggable disc):
  function dragstart(ev) {

    // write Diks-ID into dataTransfer Object
    ev.dataTransfer.setData('text', ev.target.id);

    // since dataTransfer is protected in dragenter we have to have a variable
    draggedone = ev.target.id;
  }
Event when we enter a potential target (a tower in our game)
this holds the complete logic of the game:
  function dragenter (ev) {
    // get tower that has been entered by drag and get disk-ID
    var tower = ev.currentTarget;
    var disk = draggedone;

    // get disks that are already on tower
    var disksOnTower = tower.getElementsByClassName("disk");
    if (disksOnTower.length==0 || disksOnTower[0].id>disk){

      // here if no disks yet on tower or the top disk is bigger than the dragged disk
      tower.diskCanBeDroppedHere = true; // we have to remember it for dragover
      ev.preventDefault(); // yes please!
      return;
    }

    tower.diskCanBeDroppedHere = false; // sorry no drop allowed here
  }
Event when we drag over a target tower:
  function dragover(ev){

    if (ev.currentTarget.diskCanBeDroppedHere)
      ev.preventDefault(); // if we may drop here ...

    }
rather crazy, isn't it?
Event when we drop the disc on our tower:
  function drop(ev) {
    // find disk and tower involved
    var tower = ev.currentTarget;
    var disk = document.getElementById(ev.dataTransfer.getData('text'));
    ev.dataTransfer.dropEffect = 'move';
    // put disk on top of tower
    tower.insertBefore(disk,tower.firstChild);
    // re-adjust draggability
    for (var i=0; i<towers.length;i++){ // for all towers
      var e = towers[i].getElementsByClassName("disk"); // get disks
      if (e.length) e[0].draggable = true; // top disk is draggable
      for (var j=1;j<e.length;j++){
        e[j].draggable = false; // all others are not
      }
    }
    ev.preventDefault(); // ... whatever the default is!!!
  }
Finally there are 3 more events and things to know:
dragleave, dragend and drag (fires while dragged is moved)file can be dragged and dropped (see later)FileList interface, which represents an array of individually selected files from the underlying system of the client.Blob interface, which represents immutable raw binary dataFile interface, which inherits from blob and includes readonly informational attributes about a fileFileReader interface, which provides methods to read a File or a BlobXMLHttpRequestinput Element File Upload stateBuilding a FileList using a <input type=file ... > element e.g:
    <body>
      <input onchange="getFL(event)" multiple type="file">
    </body>
getFL function:
      function getFL(e){
        var fL = e.target.files;

        var l = document.createElement('ul');
        for (var f=0; f<fL.length; f++)
          l.innerHTML +=
          '<li>' + fL[f].name + " " + fL[f].type + " " + fL[f].size + " Bytes</li>";
            // filename mime-type length in bytes
          document.body.appendChild(l);
      }
This is all it takes.
Using createObjectURL to refer to the file
function getFL:l = document.createElement('div'); for (var f=0; f<fL.length; f++) if (fL[f].type.substr(0,6)=="image/") l.innerHTML += '<img src='+URL.createObjectURL(fL[f])+' alt="Bild Filenr. '+f+'" height=100/> '; document.body.appendChild(l);
Just the same but using drag'n drop (not much change required):
    <body onload="init()">
      <p>Drop images here:
        <img  id=box src="imagebox.jpg" alt"the picture box">
      </p>
    </body>
  function init() {
    var box=document.getElementById
      ("box");
    box.addEventListener
      ("dragenter", nop, false);
    box.addEventListener
      ("dragover", nop, false);
    box.addEventListener
      ("drop", getFL, false);
  }
  function nop(e){
    e.stopPropagation();
    e.preventDefault();
  }
  function getFL(e){
    e.stopPropagation();
    e.preventDefault();
    var fL = e.dataTransfer.files;
Getting the contents using the FileReader interface:
FileReader can read the file contents into:
ArrayBuffer orString (by applying an encoding)DataUrlArrayBuffer
  var buff = new ArrayBuffer(32);
  var shortIntArray = new Int16Array(buff);
  for (var i=0; i<shortIntArray.length; i++)
    shortIntArray[i] = i;
shortIntArray will have length of 16 and hold integers 0 — 15.
DataUrl
DataUrl has the following format:data:[<mediatype>][;base64],<data>learn about:
  @media print {
    /* hide navigation controls when printing */
    #navigation { display: none }
  }
-moz-, -webkit-, -ms-, -o- calc(...) function --- cascaded variables1) Not completely true for HTML5 anymore. W3C develops HTML5 related modules (extension specs) that when ready may be integrated into HTML5 spec.
This is the CSS we have so far:
    div.game {
    width: 350px;
    height: 140px;
    margin: 10px;
    position: relative;
    background-color: #000080;
    }

    div.tower {
    width: 100px;
    position: absolute;
    bottom: 10px;
    background-color: #0000f0;
    }
    #t1 {left:10px}
    #t2 {left:120px}
    #t3 {left:230px}

    div.disk, div.bottom{
    text-align: center;
    }
First let's get rid of the text in disks and bottoms:
.disk .bottom{
                    font-size: 0px;
                    }
Let's do the basic geometry (colors are chosen randomly for now):
The game container should for now be OK:
    div.game {
    width: 350px;
    height: 140px;
    margin: 10px;
    position: relative;
    background-color: #ff00ff;
    }
We use position: relative; to allow absolute positioning within the game area!
The three containers for our towers are also OK:
    div.tower {
    width: 100px;
    position: absolute;
    bottom: 1px;
    background-color: #0080FF;
    }
    #t1 {left:10px}
    #t2 {left:120px}
    #t3 {left:230px}
We only change the distance from the bottom to 1 pixel
Let's continue on the basic geometry (colors are chosen randomly for now):
The bottom should now become a pole. We give it a width and a height and center it within the pile:
    div.bottom{
    height:120px;
    width: 10px;
    position: absolute;
    left:45px;
    bottom: 0px;
    background-color: #00c000;
    }
disks get a height of 20 pixels and an individual width:
    .disk { height: 20px;
    background-color: #ff0000;}

    #s1 { width: 30px;
    margin-left: 35px;}
    #s2 { width: 50px;
    margin-left: 25px;}
    #s3 { width: 70px;
    margin-left: 15px;}
    #s4 { width: 90px;
    margin-left: 5px;}
Easy up to here? Here is the result!
This will be our stage, rounded border at the top, ridge border at the bottom and throwing a shadow. Set a basis for z-index.
      .game {
      background-color: #a0a0a0;
      border-radius:
          10px 10px 0px 0px;
      border-bottom-style: ridge;
      border-width: 5px;
      box-shadow:
          7px 7px 3px #505050;
      z-index :-0;
      }
Here come the poles. Slightly rounded border, gradient for 3D effect, throws shadow on stage placed behind the disks:
      div.bottom {
      border-radius: 2px;
      box-shadow:
          15px 3px 7px #606060;
      background:
          -radial-gradient
          (40% 45%, #80c0ff, #1a60d0);
      z-index:-1;
      }
Let me see! Huh where are the discs now?
The disks are still there. (They only lost their color!). Let's bring them back to life! Rounded border, shadow throwing …
.disk{
    border-radius: 8px;
    box-shadow: 15px 3px 7px
    #606060;
    }
And an individual gradient for each disc for the 3D effect. We are done!
    #s1 {
    background: radial-gradient
    (40% 30%, closest-corner,
    #ffff00, #45352a);}
    #s2 {
    background: radial-gradient
    (40% 30%, closest-corner,
    #ff4000, #602727);}
    #s3 {
    background: radial-gradient
    (40% 30%, closest-corner,
    #ff00ff, #601a60);}
    #s4 {
    background: radial-gradient
    (40% 30%, closest-corner,
    #40ff00, #276027);}
Another example: use of fonts
@font-face {descriptor : value;descriptor : value; ...}
rule allows for linking to fontswoff (Web Open Font Format, .woff ), truetype (.ttf), opentype (.ttf, .otf), embedded-opentype (.eot) and svg (.svg, .svgz)url(...) and by local(...) if the font is locally installed Example HTML mark-up:
                <article>
                <div id=content>
                <p>
          In principio erat Verbum, et Verbum erat apud Deum, et
          Deus erat Verbum. Hoc erat in principio apud Deum. Omnia
          per ipsum facta sunt: et sine ipso factum est nihil, quod
          factum est. In ipso vita erat, et vita erat lux
                <img src="../images/creation-adam-eve-jean-fouquet.jpg"
                alt="Creation of Adam and Eve"/>
          hominum: et lux in tenebris lucet, et tenebrae eam non
          comprehenderunt.
                </p>
                <p>
          Fuit homo missus a Deo, cui nomen erat Ioannes. Hic venit
          in testimonium ut testimonium perhiberet de lumine, ut omnes
… and so on. Only normal paragraphs following.
Example the magic is in the CSS:
The fonts:
@font-face {
  font-family: "initial";
  src: local(GriffDinShi),
    url(GriffDinShi.ttf);
  }

@font-face {
  font-family: "bodytext";
  src: url(GutenbergTextura.ttf);
  }
Article setup:
article {
  font-family: "bodytext";
  font-size: 26px;
  text-shadow: 1px 1px 1px #808040;
  line-height : 80%;
  opacity : 0.85;

  width: 550px;
  margin-left:100px;
  padding :40px;
  background:
      url("../images/parchment.jpg");
  background-size: 100% 100%;
  }
Example the magic is in the CSS:
The initials:
p:first-letter {
  float: left;
  font-size: 340%;
  font-family: "initial";
  margin-right: 0.1em;
  color: #501000;
  text-shadow: 3px 3px 2px #400000;
  }
Other setup:
p {
  clear: left;
  opacity : 0.85;
  }

img {
  float: right;
  width: 300px;
  margin: 10px;
  }
Example but when we make two small amendments:
The content div:
<div id=content onclick="this.style.opacity=.07">
And provide a bit of style:
                #content {
                transition-property: opacity;
                transition-duration: 10s;
                }
we have a little aging animation using CSS3 transition.
CSS3 transitions are simple:
Example and when we make another small amendment:
And provide a bit of style:
                #content {
                column-count: 2;
                column-gap: 0.7em;
                column-rule: 2px solid #C7B5A7;
                }
we have a CSS3 multicolumn layout.
Flexible boxes
related standard (similar purpose, different model): CSS3 grid layout http://www.w3.org/TR/css3-grid-layout/
Flexible boxes concept and terms:
flex-directionrow row-reverse column column-reversealign-items flex-start flex-end center baseline stretchFlexible boxes concept and terms:
justify-contentflex-start flex-end center space-between space-aroundflex-grow flex-shrink flex-basis or short flexflex-start flex-end center space-between space-aroundFlexible boxes example:
container)nav main widgetswidgets has a fixed width: 250pxnav should take-up 20% of the remaining spacemain will take the restmargin: 10pxFlexible boxes example. Here the CSS:
  #container {
      display: flex;
      align-items: stretch;
      height: 90%;
    }
    #container * {
      margin: 10px
    }
    #nav {
      flex-shrink: 1;
      flex-grow: 1;
    }
    #main {
      flex-shrink: 4;
      flex-grow: 4;
    }
    #widgets {
      flex-shrink: 0;
      flex-grow: 0;
      flex-basis: 250px;
    }
How long do you fiddle for this with float? Or — even worse — using layout tables?
More beautiful things you can do with flex boxes in this example.
still a bit experimental
Computing properies with calc()
cm, mm, in, px(==1"/96), pt, pc)em, ex, ch, rem)vw, vh, vmin, vmax)url(...), rgb(...), counter(...),
Use of calc:
calc can compute expressions build with operators +, -, *, / calc must yield a type that is valid where the expression is placed + and - must be enclosed in space, no space allowed between calc and (width: calc(100%/2 - 20px);margin: calc(20px/2); :root {font-size: calc(100vh/40)} now 1rem = 1/40th viewport height. This was used for these slides btw.Access to element attributes to compute a property
attr allows to pick values from attributesattr( <attr-name> <type-or-unit>? [ , <fallback> ]? )<type-or-unit>? is one of string, color, url, integer, number, length, angle, time, frequency,
em, ex, px, rem, vw, vh, vmin, vmax, mm, cm, in, pt, pc, deg, grad, rad, ms, s, Hz, kHz, %
can be used in calc()bad news: rather not implemented by now. At risk in CR.
example (simple bar chart, data in HTML mark-up):
    <style type="text/css">
    #chart div {
      background-color: attr(data-color);
      height: 20px;
      width: attr(data-value px);
    }
    </style>
    <div id=chart>
      <div data-value=100 data-color=red></div>
      <div data-value=150 data-color=green></div>
      <div data-value=250 data-color=blue></div>
      <div data-value=125 data-color=yellow></div>
    </div>
Toggle properties instead of inheriting
attr allows to pick values from attributes( <value>, <value> [, <value> ...] )<value> listindex=(index(inherited value) + 1) mod length(valuelist)
    em: {font-style: toggle(italic, normal)}
    ul: {list-style-type: toggle(square, disc, circle)}
bad news: rather not implemented by now. At risk in CR.
Cascading variables
var-<varname>: <value>; sets a cascading variable <varname> with value <value>
:root {var-em-color: red;} sets a variable var-em-color to the value red.<property>: var(<varname>; assigns the value of variable <varname> to <property>
{background-color: var(em-color);} sets the property background-color to the value of the variable em-color.bad news: Cascading Variables are rather not implemented by now.
There is a lot more on CSS3 e.g.:
HTML5 has 2 approaches to graphics:
2D context (meanwhile there is work on level 2), webgl a Web version of OpenglHTML5 has 2 approaches to graphics:
The Canvas element — a box (like a img or video)
width and heighttoDataUrl([type,[...]]) returns a data://... URL (RFC 2397) that contains the image (pixels) in the canvastoBlob(callback [, type, ... ]) returns a blob object representing a file containing the image (pixels) in the canvasgetcontext(contextId) creates a context object associated with the canvas. This is where the graphic methods liveWe will look at the (simple) “2D” context
The “2d” context API:
canvas attribute refers to the owning canvas elementsave() pushes most of the context state on a stackrestore() pops the context stateglobalAlpha property to specify transparency of pixels painted onto the canvasglobalCompositeOperation property to specify how already present pixels interact with newly painted ones
globalCompositeOperation (graphics from modzilla)Transformations
scale(x,y)translate(x,y)rotate(angle)transform(m11,m12,m21,m22,dx,dy)setTransform(m11,m12,m21,m22,dx,dy)Images:
drawimage can draw bitsmaps received from img, canvas or video elements. See video example or video exampleVideo to canvas ...
  function canplay() {
    // more code here
    w = video.videoWidth;
    h = video.videoHeight;
    canvas.width = w;
    canvas.height = h;
    ctx = canvas.getContext("2d"); // load Context API
    ctx.translate(w/2,h/2);
    ctx.scale(-1/1.42,1/1.42);
    ctx.drawImage(video,-w/2,-h/2,w,h);
  }

  function timeupdate(){
    progressBar.value=video.currentTime;
    currentTime.textContent = tm(video.currentTime);
    ctx.rotate(Math.PI/60);
    ctx.drawImage(video,-w/2,-h/2,w,h);
  }
Properties to control line styles:
lineWidth, lineCap, lineJoin, miterLimitVarious methods for path composing
beginPath, closePathfill, stroke, clipquadraticCurveto, bezierCurveTo, arcTo, arc, rectIsPointinPathText properties and methods
font, textAlign, textBaselinefillText, strokeText, measureTextIn addition to path methods there are 3 rectangle methods
clearRect, fillRect, strokeRectStyles and shadows for strokes and fills
strokeStyle, fillStyle, shadowOffsetX, shadowOffsetY, shadowBlur, shadowColorcreateLinearGradient, createRadialGradient, createPatterncolorStopThat's nearly all about the canvas 2D context except that tere is a way to access the canvas on pixel level
ImageData that has 3 properties:
width, height and datadata is of type CanvasPixelArrayCanvasPixelArray for an image of size w,h is an array of length w*h*4 to access (e.g. the opacity component of row y, column x the index is w*y*4+x*4+3)createImageData, getImageData and putImageData can be used to access or set Canvas pixels.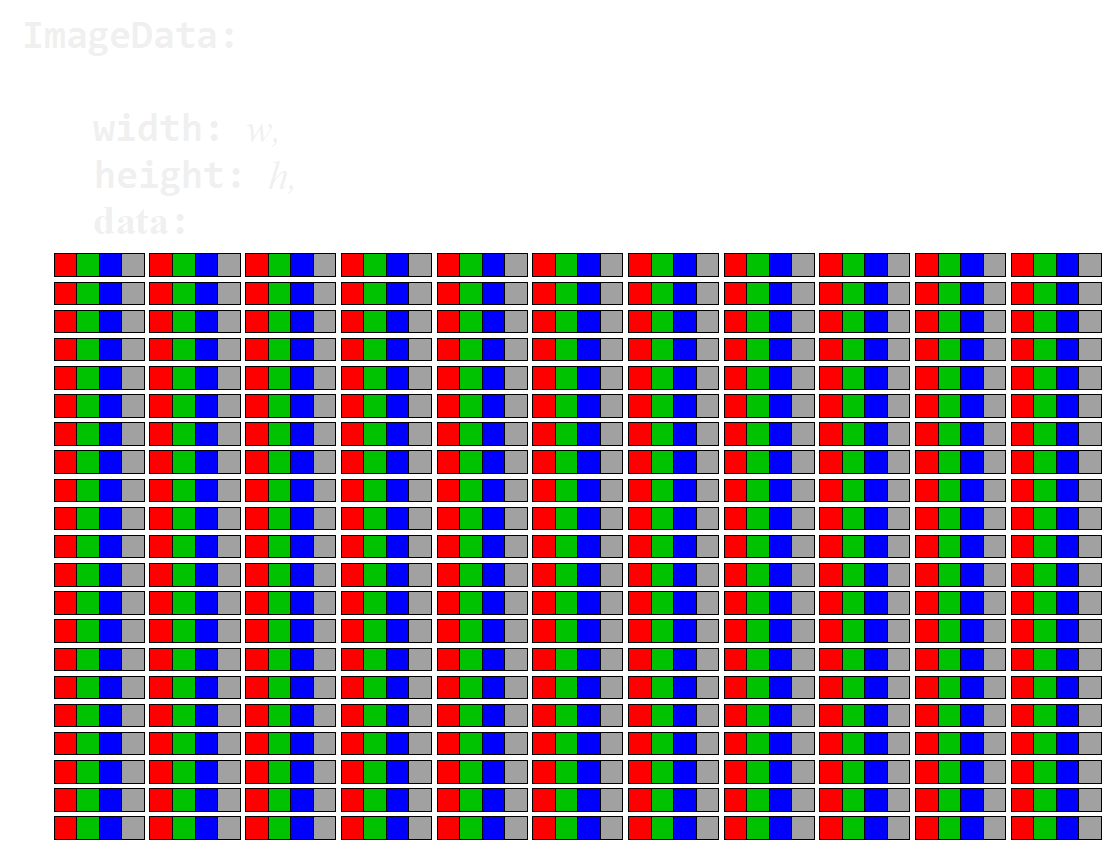
The ImageData interface allows direct access to pixels in any rectangular area of a canvas.
learn about:
Client site multi threading:
windows.Worker(script-url) (Constructor)worker.postMessage(message)worker.onmessage(event)worker.terminate()self.postMessage(message)self.onmessage(event)self.close() What they can use/access
atob()and btoa()XMLHttpRequest() keine XML (DOM) UnterstützungWorker()navigator objectData passed between the main page and workers are copied, not shared. Objects are serialized as they're handed to the worker, and subsequently, de-serialized on the other end.
I'll show you an example which demonstrates some essential limitations of Web Workers:
postmessage, onmessage must be used to share data.The idea of the example.
This Petri Net models the control flow between Web Workers and the client for the balls simulatation (with 5 balls).
Code for the Cosmos of balls (Planet) :
  function Cosmos(width,height,minr,maxr,count,attraction,ctx){
    var deltaT=1; // time between 2 calcs of new positions
    function Planet(x,y,r,c,id)
      {...}  // a ball with ... with a web worker
    function initdone(planet)
      {...} // checks if everything was initialized ...
    function startCompute()
      {...} // asks workers to compute their ball's speed and position ...
    function computedone(planet)
      { ... // new position computing finished?
      /* if we have to draw on the display */ drawPlanets() //(25 fps)
      setTimeout(startCompute,deltaT);
      }
    function drawPlanets()
      {...} // draws the current positions on canvas
    this.close = function (){{...} // stop it
Code for the Cosmos of balls (Planet) :
    // start it all ... randomly distribute balls
    for (var i=0; i<count; i++){ //...
      planets[i] = new Planet(...,i);
    }
    drawPlanets();
    // initialize Web Workers with static data
    var planetsReady = 0;
    for (var i=0; i<count; i++){
      planets[i].worker.postMessage({
        cmd: "init", ...
      });
    }
  }
Code for the Ball (Planet) Object:
  function Planet(x,y,r,c,id){ // a ball
    this.id=id;
    this.stat = {radius : r, mass : r*r*r};
    this.phys = {position : {x: x,y: y}, speed : {x: 0, y : 0}};
    this.close = function (){this.worker.terminate();};
    this.color = c;
    this.worker = new Worker("worker.js");
    planetsPhys[this.id] = this.phys;
    planetsStat[this.id] = this.stat;
    var that = this;
    this.worker.onmessage = function(event){
      var m = event.data;
      switch (m.mtype){
        case 'initdone' : initdone(that); break;
        case 'computedone' :
          that.phys.speed = m.phys.speed;
          that.phys.position = m.phys.position;
          computedone(that);
        break;
      }
    }
  }
Code to create the balls:
      for (var i=0; i<count; i++){
        r = Math.random()*(maxr-minr)+minr;
        planets[i] = new Planet(
          Math.random()*(width-2*r)+r,
          Math.random()*(height-2*r)+r,
          r,
          "rgb(" + Math.floor(Math.random()*96+32) + ","
                + Math.floor(Math.random()*96+32) + ","
                 + Math.floor(Math.random()*96+32) + ")",
          i  // id
        )
      }
Code to initialize the workers:
      var planetsReady = 0;
      for (var i=0; i<count; i++){
        planets[i].worker.postMessage({
          cmd: "init",
          stats : planetsStat,
          id : i,
          count : count,
          attraction : attraction,
          size : {w:width, h:height}
        });
      }
Code to call workers to compute a new position:
      var t1,t2,t3;
      // t1 ::= time of last drawPlanets
      // t2 ::= time of last computations
      // t3 ::= now
      function startCompute(){
        // computes for every ball the current speed and position
        planetsReady = 0; if (close) return;
        t3 = Date.now();
        var dt = t3-t2; // dt ::= time since last compute
        t2 = t3;
        for (var i=0; i<count; i++)
          planets[i].worker.postMessage({
            cmd:'compute',
            planetsPhys : planetsPhys,
            dt : dt
          });
      }
Code of the workers:
  self.onmessage = function(event){
    var m = event.data;
    switch (m.cmd){
      case 'init' : // copy global ?constants?
        self.stats = m.stats,
        self.id = m.id,
        self.count = m.count,
        self.attraction = m.attraction,
        self.size = m.size,
        self.collisionBefore = new Array(self.count);
        postMessage({mtype:"initdone"}); break;
      case 'compute' :   // compute new position and speed of ball
        compute(m.planetsPhys, m.dt);
        postMessage({mtype:"computedone",phys:m.planetsPhys[self.id]});
        break;
    }
  }
  function compute(pP,dt){...} ? // a bit of physics
(Bonus) canvas draw:
      function drawPlanets(){
        // draws the current positions on canvas
        ctx.clearRect(0, 0, width, height);
        for (var i=0;i<count;i++){
          ctx.fillStyle = planets[i].color;
          ctx.beginPath();
          ctx.arc(planets[i].phys.position.x,
            planets[i].phys.position.y,
            planets[i].stat.radius,
            0,2*Math.PI,false);
          ctx.fill();
          ctx.stroke();
          ctx.closePath();
        }
      }
Back to the roots:
WebSockets — is it still the Web?:
readyState, CONNECTING, OPEN, CLOSING, CLOSEDonopen, onerror, onclose, onmessagesend (was postMessage), closeServer-Sent Events — Websockets light:
text/event-stream
    var evtSource = new EventSource("demo.php");

    evtSource.onmessage = function(e) {
      var le = document.createElement("li");
      le.innerHTML = "server sent: " + e.data;
      messages.appendChild(newElement);
    }
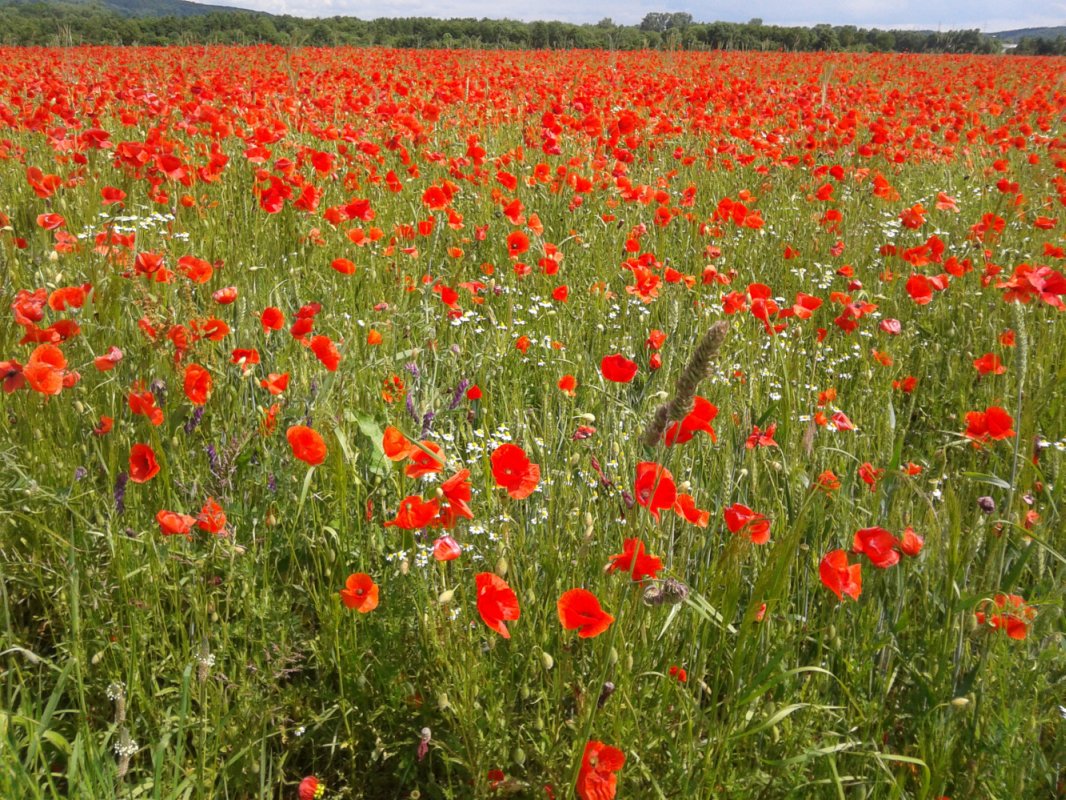
Travel safe!
Thanks Xu Han for the image!
4.3 HTML5 Structural Elements
4.4 Forms and User Interaction
4.5 Editable Content(also Introducing Local Storage)
4.6 Multimedia Mark-Up
4.7 Web Components
5 Drag'n drop
6 The File API
7.3 CSS3 new features
7.4 CSS3 Fonts (and animation)
7.5 CSS3 flexible boxes
8 HTML5 Pixels : Canvas
9 Web Workers